
There are two ways to get device data from our servers: Using Webhook or REST.
The difference between a webhook and REST is that the webhook is event-driven.
For example everytime a device’s message is received by the server, a webhook calls the URL configured.
The REST API isn’t event driven, which means you have to poll the server to get the data.
Most often, using webhook is preferred, but in this guide both will be shown.
Webhook (HTTP push API) Guide
This is a two-step process, first you have to configure the Webhook URL, and then create a script to receive the data from the webhook.
By using this you will have a POST to this URL, and the body of the POST will contains the informations about the message/event.
1. Configuring the Webhook URL
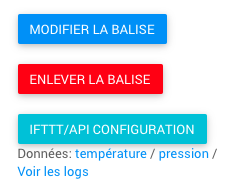 In your Hidnseek page, on the left expand your Devices’ list and select your desired tracker.
Click on the “IFTTT/API Configuration” button.
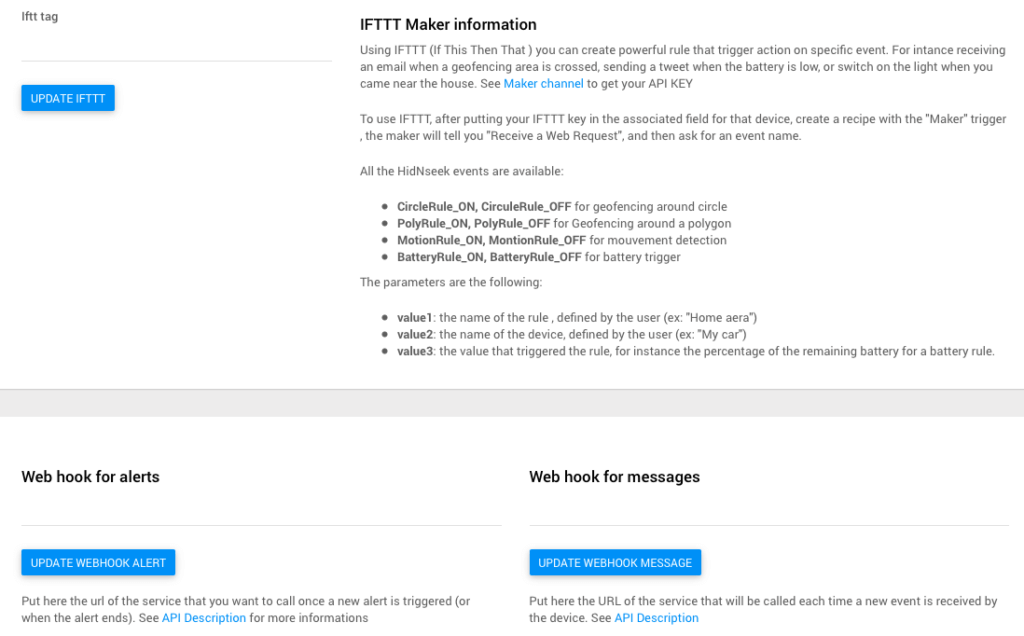
Choose if you want a webhook for messages or for alerts. Choose messages if you want to receive webhooks for every message the message sends (GPS, Motion, etc), or choose alerts if you want webhooks for every alerts (device entered zone), you can set up alerts in the device’s main page, under “Rules” link.
Put in the link of the script that will handle the webhook.
2. Format of the webhook message
The message sent by the webhook is JSON-formatted. The following fields are available:
2.1 Message Webhook
| Field | Description |
|---|---|
| id | Internal ID of the message |
| device_id | Sigfox/LoRa ID of the device |
| lat | Latitude of the device (null if not known) |
| lon | Longitude of the device (or null if not known) |
| battery | Battery Value |
| cap | Direction in degrees |
| snr | The signal-to-noise ration of the message, in dB |
| speed | The speed of the tracker in the moment of the message |
| altitude | Altitude of the device |
| temp | Temperature in degres (or null if not known) |
| press | Pressure (or null if not known) |
| timestamp | UNIX timestamp of the message |
| recorded_at | Decoded timestamp |
| sat | Number of GPS sattelites found |
| seq_number | Number of the message of the device. Note that in Sigfox this number resets at 4096, and also resets when you reboot device (for LoRa/Sigfox) |
| type_event | Event type, which are : Motion , No Motion, GPS, No GPS, Button, Weak Battery |
| tower | Antenna that recognized the message |
| extra | extra info, when “Recorded” is here this mean that this point has been recorded earlier (at the time of the timestamp) but was only sent now |
An example of message received could be:
{
"id" : 596697,
"lat" : 48.8362617492676,
"lon" : 2.29410195350647,
"battery" : 86.0,
"cap" : 270.0,
"snr" : 11.82,
"speed" : 0.0,
"timestamp" : 1469184107,
"device_id" : "746B4",
"recorded_at" : "2016-07-22T10:41:47.000Z",
"altitude" : 0.0,
"sat" : 0,
"type_event" : "Motion",
"temp" : null,
"press" : null,
"seq_number" : 665,
"extra" : null
}
2.2 Alert Webhook
| Field | Description |
|---|---|
| activated_at | the date of the alert start |
| active | false/true if the alert is still currently active or ended |
| desactivated_at | time of the end of the alert |
| msg | a readable string about message |
| rule_type | the type of the rule who generated the alert (“MotionRule”,”PolyRule”,”CircleRule”,”BatteryRule”) |
| rule_name | the name of the rule who generated the alert |
| event_start | the event that triggered the start of the alert, with the same format that in the message API push |
| event_end | if the alert ended, this field will contains the event that generated the end of the alert, in the same format that in the message API Push |
| device | the device on which apply the event |
An example of alert webhook received could be:
{
"alert" : {
"activated_at" : "2016-10-11T18:54:31.435Z",
"active" : false,
"alert_id" : null,
"desactivated_at" : "2016-10-12T08:27:46.033Z",
"event" : null,
"msg" : "Alert, tracker is not moving",
"rule_type" : "MotionRule",
"rule_name" : "Motion",
"event_start" : {
"id" : 818803,
"lat" : 43.490119934082,
"lon" : 3.71486306190491,
"battery" : 41.0,
"cap" : 270.0,
"snr" : 8.37,
"speed" : 0.0,
"timestamp" : 1476212070,
"device_id" : "73918",
"recorded_at" : "2016-10-11T18:54:30.000Z",
"altitude" : 0.0,
"sat" : 0,
"type_event" : "No motion",
"temp" : 15.6,
"press" : 1012.0,
"seq_number" : 1419,
"extra" : null
},
"event_end" : {
...
},
"device" : {
"id" : "999",
"name" : "Dummy"
}
}
}
3. Setting up the script
Since the webhook sends a POST to the URL, the pointed script has to handle the POST.
A simple PHP example, saving data to a file:
<!--?php // Getting data from webhook $data = json_encode($_POST); // Saving data to a file file_put_contents("webhook.log",$data . "\n", FILE_APPEND); ?-->
Another PHP example sending the data via email:
<!--?php // Get necessary data from POST $dev_id = $_POST["device_id"]; $event = $_POST["type_event"]; $lat = $_POST["lat"]; $lon = $_POST["lon"]; $to = 'example@hidnseek.fr'; $subject = "New message from device {$dev_id}"; $message = "Device {$dev_id} sent a {$event} message at location: Latitude = {$lat} Longitude = {$lon} "; $headers = 'From: contact@hidnseek.com' . "\r\n" . 'Reply-To: contact@hidnseek.com' . "\r\n" . 'X-Mailer: PHP/' . phpversion(); mail($to, $subject, $message, $headers); ?-->
Note: if message type is different from GPS, lat and lon contain information from last GPS it got, it is not the current position of the device.
REST (HTTP Pull API) Guide
This section will guide you through using our HTTP Pull API to get tracker data from our servers.
This is a two-step process. The first one consisting of getting your authentication token, and the second one of pulling the data from our servers in JSON format.
1. Getting your authentication token
In order to get your authentication token you will need to call the users/sign_in function
For example, one can generate a POST request using cURL to our HTTP Pull API, using the terminal, PHP or any other method available.
You will need to send a POST request with the following fields:
user[email]: Registered email address
user[password]: Password
To the following URL:
https://api.hidnseek.fr/users/sign_in.json
1.1 Example using cURL and the terminal
This is the preferred way of doing this.
In a terminal emulator with cURL, type:
curl -i -X POST -F "user[email]=EMAIL" -F "user[password]=PASSWORD" 'https://api.hidnseek.fr/users/sign_in.json'
The shell will return your token
1.2 Example using PHP
In PHP you could use the following code:
<!--?php // Login Data $login_data = array( 'user[email]' => 'EMAIL', 'user[password]' => 'PASSWD' ); // Start cURL $ch = curl_init(); // to authenticate use this url curl_setopt($ch, CURLOPT_URL, 'https://api.hidnseek.fr/users/sign_in.json'); // Make curl_exec return result curl_setopt($ch, CURLOPT_RETURNTRANSFER, true); // Tell cURL we have POST data curl_setopt($ch, CURLOPT_POST, 1); // Tell cURL which data to POST curl_setopt($ch, CURLOPT_POSTFIELDS, $login_data); // Execute $output = curl_exec($ch); // Close cURL curl_close($ch); // Decode JSON $out = json_decode($output, true); // Get authentication token $auth = $out['authentication_token']; echo $auth; ?-->
You will have your authentication token in the $auth variable.
2. Pulling devices data from the server
Now that we have the authentication token, we can proceed in two ways:
2.1 Authentication in the URL
With the email address and the authentication token, use the following URL:
| All devices | One Device |
|---|---|
https://api.hidnseek.fr/devices.json?user_email=EMAIL&user_token=TOKEN |
https://api.hidnseek.fr/device/DEVICEID.json?user_email=EMAIL&user_token=TOKEN |
This will return a JSON encoded string with the device’s data.
2.1.1 PHP Example: Authentication in the URL
Below is an example pulling data from the API using PHP and cURL.
<!--?php $email = 'your@email.com'; $auth = 'your_token'; // URLs $URL_all_devices = "https://api.hidnseek.fr/devices.json?user_email=" . $email . "&user_token=" . $auth; $URL_one_device = "https://api.hidnseek.fr/devices/DEVICEID.json?user_email=" . $email . "&user_token=" . $auth; // Init cURL $ch = curl_init(); // Set URL: either $URL_all_devices or $URL_one_device curl_setopt($ch, CURLOPT_URL, $url); // Store response in variable $output curl_setopt($ch, CURLOPT_RETURNTRANSFER, true); // Execute cURL and save response to $output $output = curl_exec($ch); // Check output print_r($output); ?-->
The data is obtained in a JSON-formatted string.
2.2 Authentication in the headers
Alternatively, it is possible to authenticate in the headers, by sending the following information in the headers:
X-User-Email your@email.com
X-User-Token your_token
2.2.1 PHP Example: Authentication in the headers
Below is an example pulling data using PHP and cURL.
<!--?php $email = 'your@email.com'; $auth = 'your_token'; $url = "https://api.hidnseek.fr/devices/deviceID.json"; // for one device $url = "https://api.hidnseek.fr/devices.json"; // for all devices $ch = curl_init(); curl_setopt($ch, CURLOPT_URL, $url); // Authentication in header curl_setopt($ch, CURLOPT_HTTPHEADER, array( 'X-User-Email: ' . $email, 'X-User-Token: ' . $auth )); curl_setopt($ch, CURLOPT_RETURNTRANSFER, true); $output = curl_exec($ch); print_r($output); ?-->
3. Pulling one device data from the server
This is the simpliest way of doing this.
In a terminal emulator with cURL, type:
curl -X GET -F "key=495KLTD1" -F "num=1" -F "type_event=GPS" 'https://api.hidnseek.fr/devices/1AEF8/positions.json'

or

curl "https://api.hidnseek.fr/devices/1AEF8/positions.json?key=495KLTD1&num=1&type_event=GPS"
The shell will return your position in json format
type_event can be “GPS”, “No GPS”, “Motion”, “No motion”, “Button”, “all”